On this page
Sweet’s tablet app provides integration with GPS and GNSS devices for high accuracy location display and data capture.
Each individual application can work with the GPS & GNSS receiver in the following ways:
- Navigate to the current location on the map.
- Capture points and vertices from the user’s current location.
- Use GPS averaging to establish the averaged location for the current location.
- Display accuracy and location on the map.
- Keep the map centred on the user’s current location as they move.
- There are options for connecting to devices as well as defining what coordinate transformations are to be used for projecting the received coordinates into the same coordinate system of the map using GPS Profile.
Workflows can be optimised by configuring shortcuts and Arcade scripts to change the active settings for a devices.
These capabilities are discussed below. Many of the settings can also be configured in the Sweet application builder, so that they are ready configured when the app is opened.
Configure default settings in the Builder
To configure a Sweet app to display GPS locations and GPS point capture, users need to enable the features within the builder.
In the Look and Feel Panel, there are two dropdowns, Location Display, and Location Capture.
If you see the message Geolocation must be enabled before location settings can be changed when expanding these dropdowns, you can do this by clicking on the Zoom and Geolocation button (top-left corner of the map area) and then toggle Geolocation on.
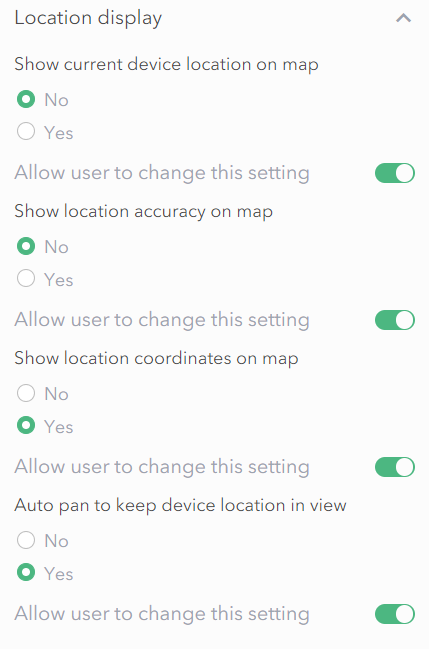
Location display
Location display settings control the ability for editors to view the device location/accuracy on the map, when the app is being accessed through the Sweet field app. The settings are to enable the current device location, the location accuracy, and the ability to auto pan the map to keep the device location in view.
These settings can be enabled/disabled through the yes/no options, but also there is a toggle to allow editors to be able to change the default state from within the app settings.
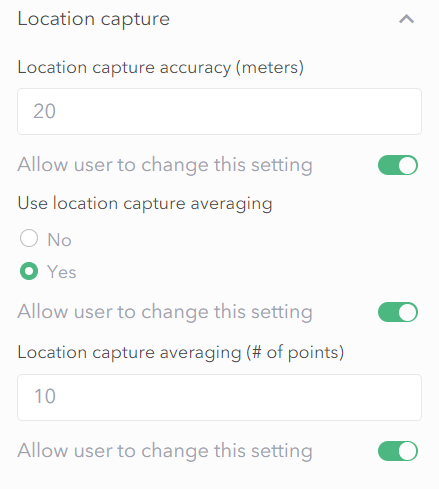
Location capture
Location capture settings control how accurately data can be captured, as well as toggles to enable the editors to change any predefined settings themselves in the settings panel in the client.
Within the builder, users can define the minimum accuracy needed from the GPS for a feature to be captured, and whether they want to enable capture averaging, which creates a feature in a location averages from a number of other control points (the number of points required for each data capture can also be defined in this setting).
GPS display settings
GPS display settings are only visible within the Sweet for ArcGIS field app. Users can go to the Settings panel to the right of the app and decide to either turn on/off the following display options:
- Show current device location on map
- Show location coordinates on map
- Show location accuracy on map
- Auto pan to keep location device in view
GPS capture settings
Users can access the GPS capture settings within the Settings panel in the client app. The settings available for editors to change include the ability to turn Capture Averaging on/off, the amount of points required for capture averaging, and the minimum capture accuracy needed.
Configure settings in tablet app
The configuration above configures how the GPS will be used in the actual Sweet app. To actually set up the connection between the GPS device and the tablet, further settings need to be applied from within the tablet app itself.
Connecting to a GPS/GNSS device
To connect to a GPS/GNSS device, follow the instructions below:
- Open the tablet app, log in, and select the user icon in the top right corner,
- Select GPS.
- The immediate screen will allow users to connect to their GPS of choice. By default it will connect to the integrated device (if there is one). If not, select the drop down box, choose the GPS device of choice. (The GPS should have a Bluetooth connection to the tablet device).
To connect to GPS/GNSS devices managed through Trimble Mobile Manager:
-
Install the Trimble Mobile Manager app on the tablet
(version 2025.24.5.0 or later is required). - Connect to the Trimble GNSS device from the Trimble Mobile Manager app.
-
Open the Sweet app, log in, and select the user icon in the
top right corner. - Select GPS.
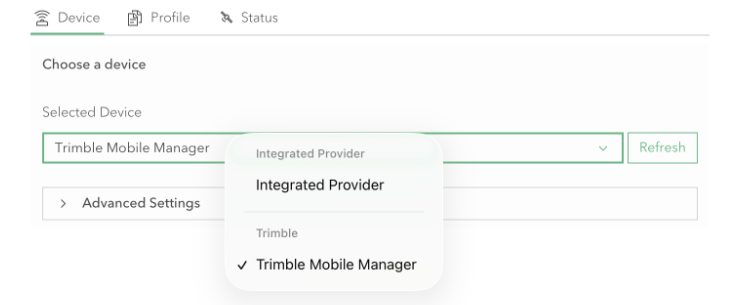
-
On the Device page, select Trimble Mobile Manager from the drop-down box.
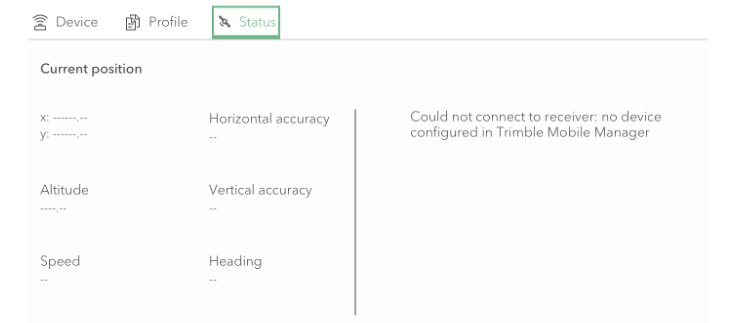
-
If a device is not configured or connected to Trimble Mobile Manager,
this will be shown on the Status page.
-
If Trimble Mobile Manager has a configured device connected to it, then the
Status page will display location information streaming from the device.
Sweet will register with Trimble Mobile Manager when the GNSS feed is started. This registration sets up authentication and gives Sweet the information it needs to communicate with Trimble Mobile Manager.
Trimble Mobile Manager does not include projection or coordinate system metadata in its output. If the coordinates provided are not in WGS84, you will need to create a GPS profile (described in the next section) to define the correct coordinate system.
Setting up GPS Profiles
Within the tablet app, a GPS profile can be set up to transform coordinate projections between the GNSS device and the web map if the projections are different (e.g. the GNSS posts coordinates in WGS84, but the web map is in British National Grid).
If a profile isn’t set up when the projections between the web map and GPS device are different, then the x/y coordinates reported from the GPS device will not appear in the correct places on the app.
By default, the Offline app comes with a default GPS Profile, which is WGS84. However, users can input their own custom profiles as well. The user needs the grid file for the profile to be accessible on the device, then open Sweet for Offline to add the profile to the app.
- Select the username in the top right corner.
- Choose the GPS button.
- Go to Profile.

- Select Add new profile.
- Give the profile a recognisable name, then enter the WKIDs for the coordinate systems of both the GNSS device and the web map the app is using. The transformation between the two coordinate systems will then appear in the drop down below.
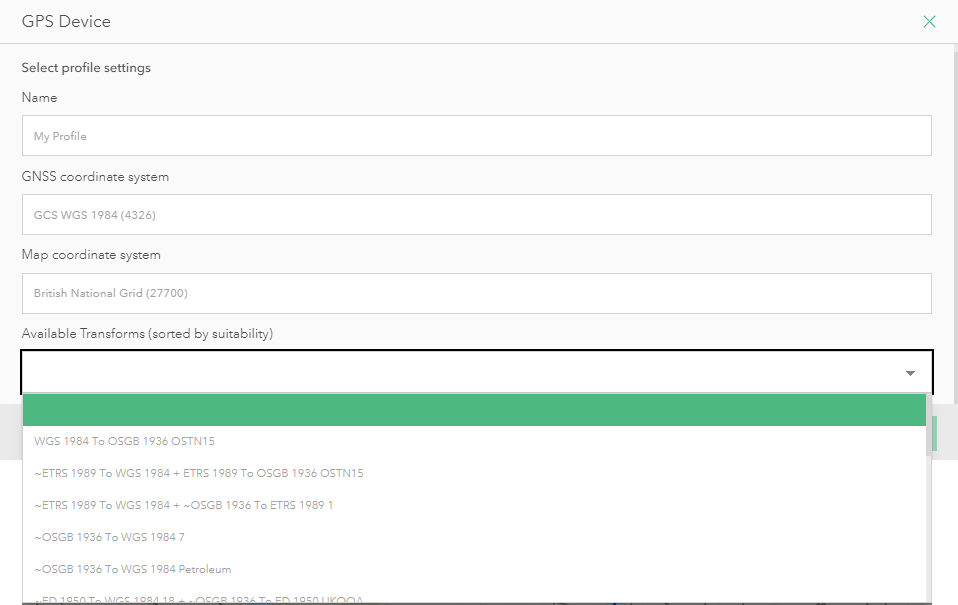
- The ArcGIS Runtime which supports the coordinate transformations has built-in transformations that editors can use. If this happens, then all the user needs to do is save the profile once the transformation is selected. If the transformation is not already built-in, then another button will appear called Download supporting files. Selecting this will download the transformation to your device and will be saved for future profiles.
- Save all changes and select the new profile to be used across the app.
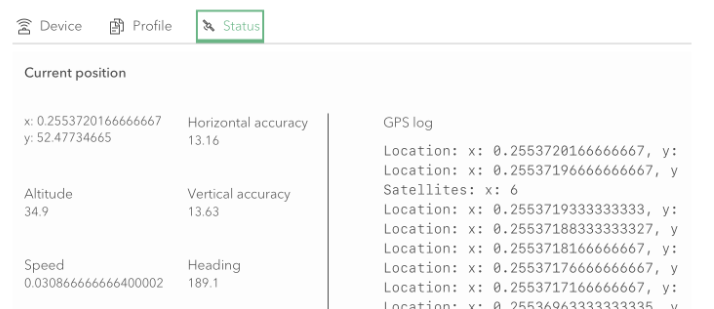
GPS Log
Within the GPS settings of the field app is the ability to view a log of the GPS connection and location status. The log will report the current x/y position, the accuracy and any messages from the GPS device.
Advanced GPS Settings
On the device page, there are some advanced settings for users that need further configuration to set up their GPS.
Antenna height (m): If a GPS device is attached to an antenna, the height can be added here.
Geoid separation (m): If a GNSS device uses Geoid separation as part of x/y calculations, this can be entered here.
Baud rate (only available on Windows tablets): If a GPS communicates on specific Baud Rates e.g. 4800, then this can be entered in this setting to ensure data is passed through the device.
Displaying GPS/GNSS Device Information
Information about the last location received from the connected GPS/GNSS device is available by accessing the “last-location” application property in a Sweet Custom Panel script.
In the following example, Trimble specific device data has been accessed to define variables in a script:
var gpsLocation = applicationproperty("last-location")

var hAccuracy = Round(gpsLocation.locationData.gpsDeviceData.hrms, 2)
var vAccuracy = Round(gpsLocation.locationData.gpsDeviceData.vrms, 2)
var battery = gpsLocation.locationData.gpsDeviceData.battery
var antHeight = gpsLocation.locationData.gpsDeviceData.antennaHeight
var tiltComp = gpsLocation.locationData.gpsDeviceData.isTIP
var solutionType = gpsLocation.locationData.gpsDeviceData.solutionType
The GPS/GNSS device documentation may provide further information about device data available for the GPS/GNSS device.
To display updates to this information a Sweet map feedback HTML Overlay script can use the “refresh” output option to specify, in seconds, how often the map feedback should automatically refresh. For example:
return {
 html: htmlString,
 refresh: 0.5
};