On this page
This guide will step through the process of deploying an instance of Sweet for ArcGIS to AWS. The architecture described in this guide includes an Elastic Beanstalk environment with a load balancer, two eC2 instances and a database.
These instructions represent one of many configuration options in AWS. You may wish to modify the architecture to meet your particular business needs.
If you are upgrading an existing installation, please refer to the Updating an existing installation section at the end of this guide.
Creating the Amazon application
The first step will be to set up the AWS Elastic Beanstalk application.
- Log in to the AWS Elastic Beanstalk dashboard
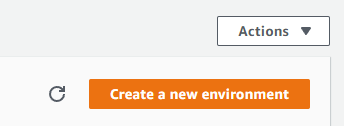
- Create a new Elastic Beanstalk environment by clicking the Create new environment button,
then selecting Web server environment
and clicking Select. - Provide the following information:
- Application name — can be any name that will help you locate the application in the future.
- Platform — Node.js
- Platform branch — Select the environment with the latest stable release of Node.js running on the newest version of 64bit Amazon Linux 2 or higher.
- Platform version — Select the recommended platform version.
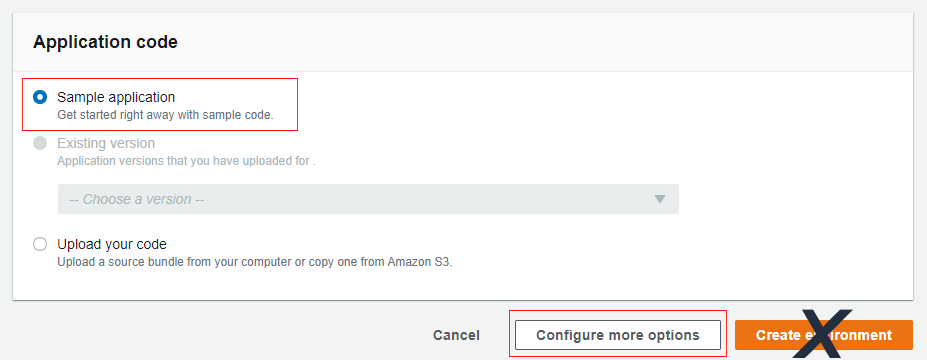
- Application code — Sample application (This will be replaced later with the Sweet deployment package.)
- Do NOT click Create environment or Create application at this stage. Instead click Configure more options.
- Configure more options
- Click the Edit button for Capacity and change the following settings:
- Environment type — Load balanced
- Instances — Min: 1; Max: 4
- The other settings can be left with their default values.
- Click Save at the bottom of the page.
- Click the Edit button for Load balancer and change the following settings:
- Load balancer type — Application Load Balancer (It is important that this setting not be changed to any of the other options.)
- Listeners — If you already have an SSL certificate available, add a listener for port 443 and protocol HTTPS. Then select the appropriate SSL certificate and set the SSL policy to ELBSecurityPolicy-TLS-1-2-2017-01. Click Add. If you do not have an SSL certificate installed in AWS skip this step for now.
- The other settings can be left with their default values.
- Click Save at the bottom of the page.
- Click the Edit button for Database and change the following settings:
- Engine — postgres
- Engine version — the latest version available
- Instance class — db.t3.micro or db.t3.small
- Storage — 5
- Username — a username of your choosing
- Password — a password of your choosing
- Database deletion policy — Delete
- The other settings can be left with their default values.
- Click Save at the bottom of the page.
- Click the Create application button at the bottom of the page.
- Click the Edit button for Capacity and change the following settings:
The Elastic Beanstalk environment will now be created. This may take several minutes to complete. Once the environment is available, click the environment’s link and make note of the environment URL.
Preparing the HTTPS certificate
Sweet for ArcGIS must be hosted on an HTTPS enabled server. An SSL certificate is required for AWS secure connections. If you already have one that has not been installed in AWS, you can import the certificate using the AWS Certificate Manager.
If you do not have an SSL certificate, AWS will provide one for free, as long as you have a top-level domain name that you can associate with your Elastic Beanstalk instance. Please see this AWS help article for more information.
Alternatively, you can create a self-signed certificate (for testing purposes only) by following these instructions.
Enabling HTTPS on the load balancer
You can skip this step if you already set up the HTTPS listener during the creation of the Elastic Beanstalk environment. Otherwise, an HTTPS listener will need to be added to your environment in order for Sweet to function correctly.
To add an HTTPS listener:
- Navigate to the Elastic Beanstalk application created earlier.
- Click the Configuration link in the side panel.
- Click the Edit button for Load balancer.
- Click the Add listener button.
- In the Application Load Balancer listener dialog box, configure the following settings:
- For Port, type the incoming HTTPS traffic port, typically 443.
- For Protocol, select HTTPS.
- For SSL certificate, select your certificate. If the drop-down menu doesn’t show any certificates, you should upload a certificate for your custom domain name in AWS Certificate Manager (ACM) as described in a previous step.
- For SSL policy, select ELBSecurityPolicy-TLS-1-2-2017-01.
- Click the Add button at the bottom of the dialog box.
Registering Sweet with ArcGIS Enterprise
Sweet needs to be registered with the ArcGIS Enterprise. To do this you will need to add an item to your portal, and ensure it is a registered item.
- Launch ArcGIS Enterprise in a browser and log in as an administrative portal user.
- Navigate to your Content and click New item.
- For the item type, choose an Application.
- Choose Web Mapping.
- Enter the URL to the Elastic Beanstalk endpoint for the Sweet application. The URL should start with https:// and end in /sweet/.
- Add an appropriate Title for the application (e.g. Sweet for ArcGIS) and select the Folder it should be saved into.
- After clicking Next, the details page of the new item will appear.
- Share the Sweet for ArcGIS item with your Organization.
- Click Settings and scroll down to App Registration. Click the Register button.
- For type of App, choose Multiple.
- For App Type, choose Multiple.
- For Redirect URI, add the https version of the Elastic Beanstalk endpoint URL. In addition add sweet://launch.html .
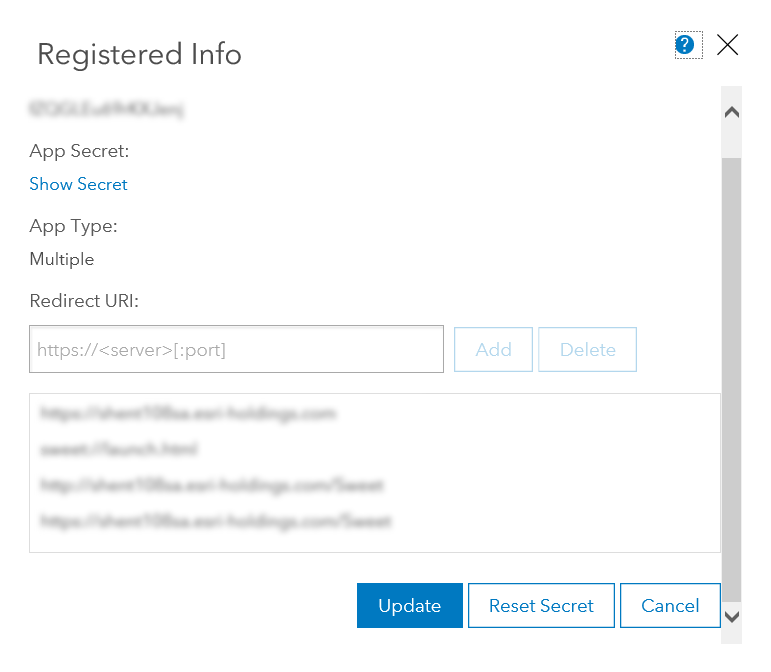
- After completing the registration, make a note of the Item ID which can be taken from the URL of the item, and the App ID which can be found by clicking the Registered Info button at the bottom of the Settings page. You will need these for the following configuration steps.
Preparing the custom AWS deployment package
Please confirm that you have the following information:
- The Application Item ID – found in the URL for the item (e.g. 70e5de5b7b8246f3ab624f32e97fbaed)
- The Registered App ID – found in the App Registration section (e.g. eIU03Dgse9iBgjIc)
- The URL of the portal (e.g. //some_arcgis_enterprise_server.com/portal/)
- The following information about the AWS database. This information can be found by going to the AWS RDS Manager, clicking on Databases, selecting the PostGreSQL database from the list of databases, and viewing the information under the Connectivity & security tab.
- Endpoint (e.g aa134yd153a5da98de.cs8am7t25ksd.eu-west-1.rds.amazonaws.com)
- Port (typically 5432)
- Database name (typically ebdb; can be found by clicking on the Configuration tab for the selected database and looking for DB name)
To prepare the AWS deployment package:
- Unzip the Sweet enterprise media to a suitable location. For example: C:\temp\media
- Copy the Sweet licence.json file into the folder at this location: (see Licensing help for more information)
…\media\installscripts\aws\license.json. - Edit the script file at: …\media\installscripts\aws\build_aws_deployment.ps1 and modify top section of the file, adding the information as prompted:
<pre class="wp-block-syntaxhighlighter-code">####### EDIT ONLY THIS SECTION BELOW ##########
# Enter the base URL of the Elastic Beanstalk application without https:// or trailing forward slashes
$AwsAppUrl = "APPURL.elasticbeanstalk.com"
# The Portal item ID - this is the text after "id=" in the URL of the item in Portal
$provisioningAppId = "ITEM_ID_FROM_PORTAL"
# The Portal "App ID" in the "App Registration" section of the item settings in Portal
$provisioningRegisteredClientId = "APP_ID_FROM_PORTAL"
# the url of the Portal without https:// or trailing forward slashes
$portalUrl = "PORTAL_URL"
### Database details
$postgressDatabase = "" # The name of the database (typically "ebdb")
$postgressHost = "" # The database endpoint (i.e. - <instanceid>.eu-west-1.rds.amazonaws.com)
$postgressPort = "" # The database port (typically 5432)
$postgressUser = "" # The username for the database
$postgressPassword = "" # The password for the database
$postgressCertificateCa = "" # (Optional) ONLY REQUIRED IF PostGres database requires SSL connection
$postgressCertificateKey = "" # (Optional) ONLY REQUIRED IF PostGres database requires SSL connection
$postgressCertificateCert = "" # (Optional) ONLY REQUIRED IF PostGres database requires SSL connection
####### DO NOT EDIT BELOW THIS LINE ##########</pre>
- Save the file.
- Run the build_aws_deployment.ps1 script by double clicking it or right-clicking it and selecting Run with Powershell. It will take approximately 3-5 minutes to run and will display a final report in the terminal when completed, including the location of the newly created custom deployment package. This customised deployment file, in zip format, can now be used in the next step to publish the application to AWS.
Deploying the application
In this step we will upload the custom deployment package we created to the AWS environment.
- In the Elastic Beanstalk console click on the environment for your Sweet application.
- Click the Upload and deploy button at the top of the page.
- Click the Choose file button and select the zip file (about 50Mbytes) from your hard drive. Deployment will take about 2 to 3 minutes. The application will be immediately available for use after the deployment has finished.
Verifying the deployment
If any of the following tests fail, verify that all of the steps above have been completed correctly.
- Test 1 – Verify the Sweet server installed correctly:
Navigate to the following URL: https://YOURDOMAIN.com/serverinfo. - Test 2 – Verify the Sweet locking server installed correctly:
Navigate to the following URL: https://YOURDOMAIN.com/socket.io/?ns=&transport=polling&t=. - Reviewing the error Logs
You can review any environment errors by accessing the server logs. Click the Logs menu item in the AWS console and requesting the last 100 lines of all the log files.
You can now visit your Sweet website at https://YOURDOMAIN.com/sweet/.
Automatically applied AWS config scripts
This section is for your information and no action is required. As part of the deployment the following changes will be applied to the AWS application environment. These changes are automatically applied to your Elastic Beanstalk environment when the deployment package is uploaded to your environment.
These AWS custom environment settings can be found in the …\media\installscripts\aws\ebextensions folder.
...\awsdeploy\.ebextensions
| Purpose | Configuration File | Details |
|---|---|---|
| Static Application paths | static-files.config | Contains the static paths made public on the server and mappings to AWS folders. |
| Web sockets | websockets-nodejs.config | This config file enables web sockets on the AWS service. |
| Health Checks | alb-default-process.config | Assists the AWS health monitor by modifying the URL monitored to a valid resource. |
| Additional Mime Types | newmime.config | Provides additional mime types to the NGINX server. |
Updating an existing installation
If you have an existing AWS Sweet for ArcGIS installation and need to update it without losing its configuration, you will need to make note of the following settings:
- The URL of the ArcGIS Portal
- The application item IDs from the Enterprise application registration
- The connection settings for the PostgreSQL database
You will also need the following
- The provided media zip package
- The provided license file
Once these are obtained, you can proceed to Preparing the custom AWS deployment package.
If the above settings are unknown, the existing settings can be obtained from a previously uploaded zip deployment package.
If this file is unavailable, it can be downloaded from AWS by going to the Elastic Beanstalk AWS Console and clicking on Applications (https://console.aws.amazon.com/elasticbeanstalk/home?#/applications), clicking on the application name, and then clicking the Application Versions link. The previously uploaded deployment zip files should be listed and available to download.
In the deployment zip file, the needed settings can be found in the following files:
<Deployment Zip file(.zip)>\web\appconfig\appconfig.js
and
<Deployment Zip file(.zip)>\config.json
The Sweet for ArcGIS licence file can also be found in this folder:
<Deployment Zip file(.zip)>\web\appconfig\license.json
Keep a note of these settings.
To continue the update process, please go to Prepare the custom AWS deployment package and complete the remaining steps.